So you may remember my post about having depression and not really working much but Im happy to say Ive moved on, recovered and Im now following my 2 passions; makeup and baking.
I did a shoot last weekend which has been entered into a competition for Stylist magazines 100th edition. It was for Mamma Jamma Cakes, a friend of mines specialist cake business and she is soooooooo lovely, I think we're quite similar. Shes doing what I want to do and Ive done what she had planned to do which was to go to uni to study theatre design. It was a really fun shoot out in the woods and the "set" was all dressed out to look like a mad hatters tea party. It looked amazing. Unfortunately the weather was not on our side but the models were absolute stars and carried on despite being wet and covered in cake from the food fight. I cant wait to see the results although I wished Id done a better job with the makeup. Even though I had practised a couple of looks, the makeup on the day was different. Once I saw the colourful aztec print cake I knew that what Id planned wouldnt have worked so I sort of winged and although she was happy, I would have liked it to stand out more but at the same time the focus was kept on the cake so......I guess we'll see how the piccies look.
Ive got a few other shoots lined up. Ill hopefully be shooting with Charlotte Chapman again soon, I love working with her. Then in November I will be doing another massive shoot in Birminghams Custard factory with Jeff Land and the team at UKWP. Ive been told to bring plenty of cakes to sell. Im actually hoping to get some of the cakes in the shots. As far as Im aware this shoot will be a mixture of Urban and Unusual weddings so a good mix of styles and a good mix of models and clothing so Im really excited.
I was goign to give up the makeup altogether but Im back in the game although not as active as before. Im not seeking out work like I used to, Im sort of waiting for it to come to me and Im happy to help out and have fun and if I get paid thats a bonus. I do enjoy doing makeup, I dont know why I thought about giving it up.
As for the baking, Ill be doing a lot of it in my spare time and I'll be helping out at a cake shop 1 day a week and joining a local baking circle too.
Ive rambled but never mind, no-one reads this anyway.

Victoria Steele Make-up Artist
Monday, 3 October 2011
Saturday, 2 July 2011
Tumble weed
Well I seem to have neglected my blog over the last couple of months.
Not much has been happening to tell you the truth but Ive been working so much (non makeup work) I just haven't physically had the time to take on any makeup work. That and my health has been suffering too. Nothing too serious. Its a lame excuse I know, but unfortunately when you have to pay your rent, creative work doesnt always bring in the pennies and a normal job takes over.
Also my time came. I think in everyones life they will experience 'the time'. The time when things just get too much and you end up having anxiety attacks over nothing, crying for hours over nothing, getting angry over nothing, feeling like your life needs to change.
So thats why Ive been away. Ive been trying to get myself right and figure out what needs to change.
Im hoping to get back into my blog soon but just bear with me whilst Im away. You can also have a look at some other things ive been up to during my time. I also have another blog called Silent Piano. I had a little go at making a comic. Ive been doing lots of stuff to keep me busy and that was one of them. Enjoy!
Monday, 11 April 2011
Beauty Bargain
So at the weekend I randomly popped into Savers, went into see if they had some good shampoo at low low prices. I didnt buy any shampoo but I did come across these beauties.

Revlon Creme Gloss. I wasn't sure about them and they werent priced so I only bought 2 in the shades which looked most exciting. I chose 065- crush on coral and 020 fiercely fuschia. I almost didnt buy them until I saw they were Revlon so I thought maybe they wouldnt be too bad. Its quite rare to find branded makeup in Savers. They priced at £1.40 each which is very cheap but this also made me dubious about the quality but me oh my was I surprised when I tried them out. Im such a pessimist.
The applicator is a brush which put me off completely for a number of reasons the main reason being hygiene especially for using it in my kit, might not be so bad for personal use, the other was the fact it didnt look like it would apply very well since it was so soft.

After a lot of twisting and clicking the bottom to push the gloss through to the brush a whole lot came all at once. I even started to think Id got a dudd and was never going to get any product out.
Heres how the 2 shades look on the back of my hand. This was when I became impressed. I love the colours, they were a lot more vibrant that they looked in the tube.
I lined and filled my lips with colours that almost perfectly matched the 2 shades before applying each gloss with a lip brush. Once I saw how they looked on, I was hooked. Crush on CAt this point Im very impressed, especially at how little they cost.
I was massively impressed. Non-sticky, easy to apply, really glossy finish. I am in love. They had a few more shades available in various red and nude tones and I will definitely be filling my kit with these beauty bargains. I cant wait to use them and I cant wait to get more and at £1.40 I dont have to feel guilty about the price.

Revlon Creme Gloss. I wasn't sure about them and they werent priced so I only bought 2 in the shades which looked most exciting. I chose 065- crush on coral and 020 fiercely fuschia. I almost didnt buy them until I saw they were Revlon so I thought maybe they wouldnt be too bad. Its quite rare to find branded makeup in Savers. They priced at £1.40 each which is very cheap but this also made me dubious about the quality but me oh my was I surprised when I tried them out. Im such a pessimist.
The applicator is a brush which put me off completely for a number of reasons the main reason being hygiene especially for using it in my kit, might not be so bad for personal use, the other was the fact it didnt look like it would apply very well since it was so soft.

After a lot of twisting and clicking the bottom to push the gloss through to the brush a whole lot came all at once. I even started to think Id got a dudd and was never going to get any product out.
Heres how the 2 shades look on the back of my hand. This was when I became impressed. I love the colours, they were a lot more vibrant that they looked in the tube.
 |
| TOP: Firecely Fuschia BOTTOM: Crush on Coral |
 | |
| Fiercely Fuschia |
 |
| Crush on Coral |
I was massively impressed. Non-sticky, easy to apply, really glossy finish. I am in love. They had a few more shades available in various red and nude tones and I will definitely be filling my kit with these beauty bargains. I cant wait to use them and I cant wait to get more and at £1.40 I dont have to feel guilty about the price.
Thursday, 7 April 2011
Bridal season begins
April is the month the bridal season kicks off......well for me it seems like its all kicking off now. And of course we have the Royal Wedding to look forward to. So I thought I would share with you a bit about the bridal makeup work Ive been doing and what is still to come for me this year and also my 3 top bridal makeup tips.
My first piece of bridal work came last year when I organised a shoot with Catherine at The White Dress Boutique in Leamington Spa. I used some girls from my workplace as willing models and teamed up with local photographer Lucy Clarke for the shoot and the girls all looked gorgeous in their wedding dresses. You can see the photos on my facebook page.
My most recent photoshoot was a couple of weeks ago and it was amazing. Some of the photos are in my Bridal Gallery already and it gave me a great opportunity to work on a variety of models and also build my portfolio. We shot at the Menzies Welcombe Hotel and at Billesley Manor in Stratford. It was great to see so many different wedding dresses as well as some Indian bridal outfits and was brilliant to meet and work with so many photographers. One of my favourite looks from the day was definitely on Tiff who wanted to look a bit like Katie Price, false lashes, dark eye makeup, bright pink lips. Was fun to do.

This Saturday Ill be doing my first Bridal Fashion Show at the Smudge Magazine Wedding Fayre which Im sure will be a great day.Im a bit nervous but also very excited.
Later this year I'll also be doing a photoshoot with local dress designers LuaSarcy. Lucy and Sara are both fab so Im really looking forward to working with them.
I absolutely love what I do and bridal makeup is possibly one of the most rewarding jobs, making someone look and feel absolutely gorgeous on their wedding day, I cant think of anything better and of course its always nice to meet so many lovely brides.
My top 3 tips for bridal makeup:
- Always use waterproof mascara, especially if youre an emotional bride or if your eyes get watery in the sun like mine. Use brown mascara for a more natural look and use black for a dramatic look or to finish off a smokey eye. Similarly, make sure you use a waterproof eyeliner. Liquid liner tends to run unless its waterproof. I prefer to use a cream or gel liner.
- Your wedding day is not a day to be trying out a new look. You want to look like yourself but at your best. You dont want to be unrecognisable, especially to the person youre about to marry, so stick to a look you know works for you, and if you dont usually wear makeup, keep is simple and natural by highlighting your best features.
- Make sure you have a touch up kit. Touchup kits usually include some extra powder for avoiding any shine throughout the day and some extra lipstick. Your wedding day is a day of kissing, talking, drinking and eating so youll probably need to touch up the lippy at some point. For a longer lasting lipstick, use a lipliner to line and fill the lips before applying your lipstick. Applying it with a brush also helps.
Wednesday, 6 April 2011
Whispers of a Sea Nymph
You can now see Issue 2 of Rebel Magazine online. My work is featured on an 8 page spread from page 74 onwards and the series is called "whispers of a sea nymph". Its been nearly 8 months since the shoot and I must admit, i was beginning to wonder if Id ever see the images but seeing them today has made it worth the wait :)
Some other photos from the same series are dotted around in the issue which Im really pleased about.
Take a look here
I do prefer the cleaner looks, the smudgey looks didnt turn out so well but its still early days, im still learning and this was my very first photoshoot so.....I think I can be forgiven a little bit.
I may be doing more for Rebel Magazine in the future so....watch this space. For now, I hope you enjoy Issue 2
Friday, 25 March 2011
Photoshoot with Charlotte Chapman - Sneaky peeks
So today I had my second photoshoot with the fantastic Charlotte Chapman. Her photos turned out amazing last time so I was very excited to shoot with her and we had an absolutely stunning model today.
It was a lovely spring day, the weather was gorgeous, the flowers are just starting to blossom, I couldnt have asked for a better setting or better weather. The makeup for todays shoot was soft, pink and feminine with some shimmer and a bit of an edge. Our model Bayleigh usually wears bright red lipstick so it was a bit of a shock to see herself with nude lips. The looks were based around 2 flower necklaces charlotte had so we did 2 looks, for the second look I added some blue eyeshadow, metallic purple cream eyeliner and a pink lip.We wanted it to look really carefree, just really chilled out and I actually challenged myself to do hair. I was very impressed with myself. I managed to do a loose fishtail plait with a little help from youtube and I put some curls in as well, the look was quite messy which is what we were going for. Its given me the confidence to try out doing hair again.
Anyway, here are some sneak peeks from the shoot - behind the scenes style. I didnt get as many as usual as I was holding a reflector most of the shoot.


Ill put some of the finished shots up when theyve been edited. Im very excited, I forced Charlotte to show me some of the pics she shot today and they already look amazing. Im not sure how well the shimmery eyeshadow will show up...hopefully itll be pretty. Lots of flowers around so definitely a good spring shoot :)
Thanks to Bayleigh and Charlotte for a great day.
Wednesday, 23 March 2011
Rebel Magazine Issue #2
Some of you remember waaaaaaaay back sometime last year when I did some makeup for Rebel Magazine.
The release date of issue 2 kept getting pushed back for a variety of reasons BUT now they have set a release date for the 30th March.
Heres the pic theyre using for their promo:

You can still see Issue 1 here. And dont forget to check back on the 30th to see the full set of images from the shoot. I still dont know which ones theyre using so Im very excited although I think theyve used one of the best for the promo. What do you think?
MUA:Victoria Steele
Clothing and Jewellery: Shiromi Lazarus
Model: Cyan Cheung
Photography and Styling: Namal
Spring has sprung
5 things I love about spring:
I was also happy that spring time showed itself for the wedding photoshoot on Sunday, the weather was perfect.
Ill be putting some piccies up from the shoot later this week or possibly today.
- The promise of warm weather although Ill probably end up working indoors again all summer....I sort of missed last summer completely and just watched it pass me by through the shop window :(
- Flowers starting to appear
- Saying hello to dresses of the floral and colourful variety and goodbye to dull winter clothes
- Spring makeup trends
- Different food. Over winter I seem to have a lot of stews, casseroles, soups etc now Im quite looking forward to salads and fruit.
- Bees and wasps
- The unpredictable weather and having to carry around a coat and umberella just incase it rains
- Getting my ghostly white legs out to get a bit of colour - this almost never happens as I hate my legs but they really do need to see some sunshine.
- The fact that all my summer shoes went mouldy in my old flat so Ill have to carry on wearing winter boots until I can afford summer shoes
- Not being able to wear sunglasses - prescription sunglasses are just hideous
I was also happy that spring time showed itself for the wedding photoshoot on Sunday, the weather was perfect.
Ill be putting some piccies up from the shoot later this week or possibly today.
Thursday, 10 March 2011
New business cards :D
Just wanted to share my new business cards and do a little review of my experience with moo.com and their service.
So their estimated arrival was 15th March, theyre 5 days early and I love them. I got 50 made, came to a little over £16 inc. P&P which I think id very reasonable considering the quality.
Here they are:

And a close up of the back:
 My photos of the cards are a bit grainy but the actual quality of the cards is brilliant. I chose a matte finish. I think the choices are a little bit limited and you also have a small choice of card type as well. The colours are really vibrant and the quality of the card is great. I chose the standard business cards but they do postcards and mini cards as well, the mini cards are actually quite cute but as I have to rely on my images to promote my work I needed something a bit bigger. What attracted me to moo in the first place was the fact you can have as many different images as you like, you dont have to have the same cards, you can have a different image on each card if you like. I uploaded 5 images and received 10 of each image so the people you give them to can choose the card which appeals to them and you can get more of your work out there to potential clients rather than just showing them 1 image, 1 example of what you can do.
I found their service easy to use and understand, very clear and being the big kid I am I loved receiving the update e-mails from a service robot called Little Moo telling me about the progress of my order and how to seek further help if I wanted to speak to an actual real person.
They arrived really well packaged and came with a gorgeous little black storage box with separaters (is that correct?) titled 'Mine' and 'Theirs' so you can have a place to store your cards and cards youve collected from other industry professionals. I love it.
However, Im not 100% happy with my black and white cards...the image is grainy and Ive been told the image I used wasnt hi-res enough, it looked fine during the ordering process. Moo have kindly offered me a replacement order of 50 cards which has boosted me back up to being 100% happy with their service. I will certainly be re-ordering more cards in the future especially since I have an exciting bridal photoshoot coming up next week which I will keep you all updated about.
If you need business cards, I definitely recommend using moo.com I wont be going anywhere else.
So their estimated arrival was 15th March, theyre 5 days early and I love them. I got 50 made, came to a little over £16 inc. P&P which I think id very reasonable considering the quality.
Here they are:

And a close up of the back:

I found their service easy to use and understand, very clear and being the big kid I am I loved receiving the update e-mails from a service robot called Little Moo telling me about the progress of my order and how to seek further help if I wanted to speak to an actual real person.
They arrived really well packaged and came with a gorgeous little black storage box with separaters (is that correct?) titled 'Mine' and 'Theirs' so you can have a place to store your cards and cards youve collected from other industry professionals. I love it.
However, Im not 100% happy with my black and white cards...the image is grainy and Ive been told the image I used wasnt hi-res enough, it looked fine during the ordering process. Moo have kindly offered me a replacement order of 50 cards which has boosted me back up to being 100% happy with their service. I will certainly be re-ordering more cards in the future especially since I have an exciting bridal photoshoot coming up next week which I will keep you all updated about.
If you need business cards, I definitely recommend using moo.com I wont be going anywhere else.
Friday, 25 February 2011
Soap & Glory Madness
Ok so Im sure all aware of my recent obsession with Soap & Glory.
I accidentally stepped into Boots and found myself taking full advantage of their 3 for 2 offer.
I bought 6 new items, heres my collection so far.
 I feel so naughty but Im going to smell so nice :P
Ill be reviewing more products once I have some time.
I accidentally stepped into Boots and found myself taking full advantage of their 3 for 2 offer.
I bought 6 new items, heres my collection so far.

Ill be reviewing more products once I have some time.
Thursday, 24 February 2011
Garra Rufa Fish Foot Treatment.....is it just a craze?
I may have mentioned that it was my birthday recently :p My boyfriend treated me to a foot treatment at a spa and Ive got to say I was a little dubious.
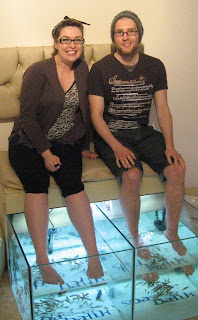 I'd heard about these foot treatments where little fishes nicknamed "Dr Fish" nibble at your tootsies and eat all the dead skin, it seems to be the latest craze.
 I LOVE these little fishes. I wish I had taken a before and after photo. My feet were proper crusty before the treatment and they were so soft and lovely after they nibbled at me. Even my toenails look nicer. Its weird as well, when I was walking home afterwards I felt really floaty and relaxed, was lovely. Im going to try to go once a month as a treat, its fairly affordable at just £13 for 15 minutes although our 15 minutes soon turned into half an hour. I usually hate getting my feet out but after that, I never wanted to wear shoes again. Its a shame its still winter boots weather.
You can also have your hands done too and Ive heard rumours you can have your whole body done although I think thatd be a bit weird.
Everyones been asking me what it felt like. Honestly? It felt like little bubbles underneath my feet, similar to the feel of a foot spa. Although there was one slightly bigger fishy and I could feel him nibbling away which was a bit distracting. Those little guys did a good job though. Is it a craze? I hope not because I am hooked (I know theres a joke in there somewhere). Also dont worry about squishing the fish with your feet, they scatter as soon as theres any movement then swarm around your feet once theyre still. Highly recommended.
Here are the facts about "Dr Fish" or Garra Rufa fish copied from the spa balik website which is where we went:
"Our dead skin cells may sound like an unappetising diet, but for fish that thrive in hot water up to 43 degrees centigrade, where nothing of much nutritional value can survive, a bather dipping in a toe is a welcome feast. In an unusual reversal of the food chain, the fish spa treatment is mutually beneficial to you and the fish. They feed while you have your skin exfoliated. It is believed that Garra Rufa fish secrete an enzyme, diathanol that improves skin regeneration.
It is also claimed these marvellous little fish can also stimulate acupuncture points helping to regulate the nervous system, relax the body and release tension. Your blood circulation and flow is also greatly increased during the treatment.
Their suction-cup mouths are perfectly shaped for gently lifting dry skin away, without damaging the healthy new cells underneath - revealing soft, supple and smooth skin for you. More importantly, fish therapy is a completely painless process. Most people find it pleasurable, a tickling, almost tingling sensation something akin to a light massage."
Wednesday, 23 February 2011
Re-review of Benefit Do it Daily Moisturiser
I feel I didnt give this product a fair chance. I slated it as the worst product ever and now think it deserves a re-review.
You can see my first review of Benefit's "Do it Daily" here

After saying it was the worst thing Id ever put on my skin and I never wanted to use it ever again, I have actually used it a couple more times since reviewing it and my boyfriend seems to be taking a shine to it as well. He has oily skin so he likes using this one although it did sting his eyes. He tried to blame it on the eye serum I applied to him afterwards (he keeps complaining about his bags since he started his early shift) but Ive got that in my eye before and it doesnt sting at all. But yeah Ive been using it and Ive noticed a difference in my skin.
Even though its oil free, my dry patches seem to be clearning up as well, my oily areas are no longer my oily areas and Im liking it so much I barely notice the vinegary smell I mentioned previously and the stinging sensation is gone. Ive actually noticed it sinking into my skin better, it leaves my skin lovely and soft and smooth feeling afterwards. Maybe Id just exfoliated too hard on that particular review day but Im actually liking this product. I wouldnt say loving in, love is a strong word saved only for products I will use religously and repurchase. This one, I still wouldnt buy it, I still stick to the fact that its overpriced and its not that great but I have to aplogise to Benefit for previously slating this not so bad product. I'll continue to use it if Im feeling oily and no doubt my boyfriend will continue to ask where it is so he can use it.
Soap & Glory "Marvelips" review
For my 25th birthday I received some Soap & Glory products which I am loving. Ive been wanting to try them for a while but I wasnt sure if the packaging was too much and trying to make a big deal out of a product which was nothing special, I thought maybe they were cashing in on the vintage market.BUT Ive been proven wrong. Not only is the packaging fantastic (I love this sort of style) its got lots of light hearted information on it about the product and what it aims to do and how it was tested etc. I also think their products have given me a push in the right direction in trying to copy the looks on the packaging by using their products.
Ramble ramble ramble. Basically I am totally in love with this range of products and could easily spend hundreds of pounds on it. Its not badly priced, its affordable, smells lovely and I think their stuff is great quality.
Ok on with the review. Today Im reviewing "Marevlips" which is a double ended lip pencil which aims to shape and supersize the lips (not that I need any help there). £8.43 at Boots and they currently have a 3 for 2 offer on. Ill probably be going back for more although Ill probably buy from their fantastic skincare range.

One end is colour, the other is highlighter. On the back of the packet it gives instructions on how to apply but I didnt find that their technique worked for me. It advised to fill lips with colour then use the highlighter to pick out the middle of the lips for a pouty look. But this just made the highlighter end messy which I didnt like. You can see that the highlighter is actually quite glittery but I liked it. The texture is very silky and its easy to apply, I felt like it was moisturising my lips.

So I applied the highlighter first to the middle of the lips and the cupids bow then I filled in with colour leaving some of the highlight showing through. This worked really well on the cupids bow especially later int he day when I filled my lips in with a bright red. The camera doesnt pick the highlights up very well.
 As far as Im aware this only comes in one colour which is a sort of dusky pink shade, fairly natural and great for every day wear. Ive worn it quite a lot and now need to invest in a big fat sharpener for it since I definitely want to carry on using it. I love it. Very soft and silky, lovely colour. Just wish it lasted a bit longer.
Ramble ramble ramble. Basically I am totally in love with this range of products and could easily spend hundreds of pounds on it. Its not badly priced, its affordable, smells lovely and I think their stuff is great quality.
Ok on with the review. Today Im reviewing "Marevlips" which is a double ended lip pencil which aims to shape and supersize the lips (not that I need any help there). £8.43 at Boots and they currently have a 3 for 2 offer on. Ill probably be going back for more although Ill probably buy from their fantastic skincare range.

One end is colour, the other is highlighter. On the back of the packet it gives instructions on how to apply but I didnt find that their technique worked for me. It advised to fill lips with colour then use the highlighter to pick out the middle of the lips for a pouty look. But this just made the highlighter end messy which I didnt like. You can see that the highlighter is actually quite glittery but I liked it. The texture is very silky and its easy to apply, I felt like it was moisturising my lips.

So I applied the highlighter first to the middle of the lips and the cupids bow then I filled in with colour leaving some of the highlight showing through. This worked really well on the cupids bow especially later int he day when I filled my lips in with a bright red. The camera doesnt pick the highlights up very well.

First tutorial: 50's inspired
Ok Ive been promising a tutorial for a while now and Ive been nervous to start doing them just because:
a) Im not sure Im good enough
b)my makeup never photographs very well and
c) I dont even know if you guys are interested
so I thought Id start out just by taking photos of the make-up I did on myself today (Im trying out a new style since I turned 25 and I think Im liking it - a bit 50's inspired, probably bought on by my new love of Soap & Glory, I love the images on their packaging). I also used a lot of the products Im going to be reviewing this week so keep your eyes peeled for the reviews but for now heres a step by step tutorial.
So feel free to follow this step by step to create your own 50's inspired look.

I hope you enjoy it, let me know if you like it and if there are any looks youd like me to include in my future tutorials e.g celebrity looks, film/theatre looks, fashion looks etc etc.
Here goes.
Before I put my makeup on every day I cleanse my face and moisturise. These are 2 steps I never skip ever. At the moment Im using Ponds Hydranutrivita Moisturiser because my skin is still reovering from the cold winter weather and is quite dry.
After moisturising I usually apply some of Benefits "The porefessional" which is a pore minimising primer but today I skipped that step as I was rewiewing as I was going. My first step today was to apply "you wont believe your eyes" by Soap Glory under my eyes.
 I applied this with the applicator and then I patted it into my skin with a clean finger as it didnt sink in very quickly on its own.
I then applied foundation. Todays foundation was from a Tester of Clarins Skin Illusion Foundation. I always apply from the nose outwards and I apply with clean fingers for easier blending. Remember your face doesnt stop at the jaw, you dont want tide marks. I always blend the foundation under my jawline and blend it out into my neck so it fades into the colour on my neck and chest especially if its a bit darker than usual like this one.
 (I would usually use a Max Factor foundation and maybe mix 2 shades together to get a colour match).
This shade was actually slightly dark for me but I loved the texture and coverage. (Just ignore the fact its a bit dark).
Heres a close up after application.
 I always apply concealer AFTER foundation. Sometimes the coverage of the foundation alone is enough to hide any blemishes but today I used an under eye concealer (rimmels "Recover" anti fatugue concelar) and a product I dont usually use (Benefits "it stick") which I thought would be best for concealing around the nose and to highlight a couple of areas as it was lighter than my foundation.
 I blended the concealer with a clean finger. Under eye concealer should be patted into the skin not dragged or wiped.
Then I set with powder. You can use a translucent powder, but I prefer to use a slightly coloured powder which matches my foundation. I tend to just sweep this onto the nose and outwards onto my chin and forehead, anywhere I dont want too much shine. I tend to miss out my cheeks as theyre going to have blush on them anyway. Powder will set any concealer youve applied and take away any unwanted shine.

I then apply blush. The colour will depend on what look Im going for. If I want sculpted cheeks I go for a brownish blush just underneath the cheekbone, quite often I will go for quite a bronzed cheek to add a bit of colour but the colour I wear more than anything is a pink tone. I actually love Rimmels range of blush (notice how Im not using any of my fancy kit products, just my every day cheap makeup)
 This is a nice one, its actually got quite an irridescent light pink which gives a bit of shine to my cheeks. This is what I decided to wear today, just lightly swept up onto my cheekbone to add a hint of colour.
 Time for eyes. I always start with the lightest colour. Its weird because when I do other people's makeup I start with the darkest and blend out to the lightest. But anyway I started with a matte white shadow all across my eyelid and up onto my brow bone applied with a really soft fluffy shadow brush which Ive had for years and years and never lets me down, its the best for applying base colour.
 Then I applied a matte dark brown shadow from the lashline to the crease, really pushing it into the socket to get a defined crease. You can then blend this a bit more using the brush you used fro the white shadow. This just softens and blends the edges a bit.
 Then the same brown underneath the eye, just along the lashline with a liner brush.
 This is a Ruby and Millie square brush for lining. Its not the easiest for lining but Ive sort of gotten used to it. I only ever use it for lining with shadows. Just adds a bit of extra definition around the eye.

If Im not doing a dark dramatic eye, I line my waterline with white eye pencil to brighten and open the eye. I use this quite a lot on brides for the same reason.
 Because I wear glasses I find it's important to define my brows and frame my eyes.
 Ive tried a few different products, brow gels, brow pencils etc etc but I always find myself going back to brown shadows applied with a stiff angled brush. Im using a GOSH angled brush here which I love for brows.
Here (hopefully) you can see the difference between an un-defined brow and a brow thats been defined with brow shadow.
 And here are my 2 brows all finished and defined. Its also important to say that I tidy up my brows and pluck any stray hairs before I start my makeup.
 For that classic 50's look, you need a sweeping black eyeline. Theres plenty of different products out there; powder, pencils, gel liners, liquid liners. I love gel liner but for this style I think the liquid liner works the best. It can be a bit tricky and does take a bit of practise, maybe youll need to tidy it up afterwards and its always hard getting both eyes to match too so just practise your winged liner.
Take your time, apply with a steady hand. Your flick needs to flick upwards to open the eye and I find it useful to do the flick first with my eye open so I can carry on the line of my lower waterline at the same upward angle (if that makes sense). Once Ive got the flick I close my eye and line from the outside in. This is just the easiest way for me, you may find your own way.

So its all starting to come together nicely. We have the neautral shadows, the strong defined brows, the winged liner. Time to apply mascara. Its totally up to you how much you apply. The classic 50's look proabbly would have been quite minimal or only on the upper lashes but I love mascara so I applied quite a lot of it especially because my lashes at the moment are quite sparse and short :(
 Thats the eyes sorted. For the 50's inspired look the lips are also very important, quite a defined cupids bow and a very sultry, pouty look. Lots of people probably associate the glossy red lip with the 50's style which I love but I tried to tone the lips down a bit as it was during the day and I was only leaving the house to pick up the boyfriend which I didnt think was an appropriate use of the glossy red lip.
Sooo..........I used another Soap & Glory product called Marvelips which has 2 ends. One end is colour, the other end is highlighter. It advised you to apply the colour first then use the highlighter in the middle of the lips afterwrds but I tried this and it didnt work for me so I applied it in reverse. I coated my lips in the highlighter first which I felt moisturised them a bit. I applied lots of the hightlighter to the cupids bow to accentuate it.
 I then applied the colour which was a sort of dark dusky pink, quite a neautral tone which I really liked especially for daytime. I applied most of the colour to the outer edges trying to leave the highlight in the middle for a pouty look.
 I took a piccie out of direct light as it wasnt showing the true colour. You can also soo in the middle where ive left a bit of the highlighter showing through. I love this product. Really soft and silky :)
 I then decided it wasnt quite bright enough to match my nails and the red in the top I decided to wear so I went over this colour ( i used marvelips as a base) with Models own tangerine lip balm.

I wore this on Saturday over rel lip pencil and it gave a lovely bright pop of colour and a gorgeous glossy silky finish so perfect for a classic 50's look with the bright red lips. But for now I just wanted a brighter pop of colour so I applied a bit of this with a lip brush.
 That's it, all finished. Im slowly mastering a 50's style fringe.

I hope you all enjoyed my first tutorial. I just feel like Ive ramble but hopefully Ive made sense and maybe Ive inspired you to create your own 50's inspired looks.
Im quite liking this look, Ive tried it out the past few days, maybe Ill keep it.
a) Im not sure Im good enough
b)my makeup never photographs very well and
c) I dont even know if you guys are interested
so I thought Id start out just by taking photos of the make-up I did on myself today (Im trying out a new style since I turned 25 and I think Im liking it - a bit 50's inspired, probably bought on by my new love of Soap & Glory, I love the images on their packaging). I also used a lot of the products Im going to be reviewing this week so keep your eyes peeled for the reviews but for now heres a step by step tutorial.
So feel free to follow this step by step to create your own 50's inspired look.

I hope you enjoy it, let me know if you like it and if there are any looks youd like me to include in my future tutorials e.g celebrity looks, film/theatre looks, fashion looks etc etc.
Here goes.
Before I put my makeup on every day I cleanse my face and moisturise. These are 2 steps I never skip ever. At the moment Im using Ponds Hydranutrivita Moisturiser because my skin is still reovering from the cold winter weather and is quite dry.
After moisturising I usually apply some of Benefits "The porefessional" which is a pore minimising primer but today I skipped that step as I was rewiewing as I was going. My first step today was to apply "you wont believe your eyes" by Soap Glory under my eyes.

I then applied foundation. Todays foundation was from a Tester of Clarins Skin Illusion Foundation. I always apply from the nose outwards and I apply with clean fingers for easier blending. Remember your face doesnt stop at the jaw, you dont want tide marks. I always blend the foundation under my jawline and blend it out into my neck so it fades into the colour on my neck and chest especially if its a bit darker than usual like this one.

This shade was actually slightly dark for me but I loved the texture and coverage. (Just ignore the fact its a bit dark).
Heres a close up after application.


Then I set with powder. You can use a translucent powder, but I prefer to use a slightly coloured powder which matches my foundation. I tend to just sweep this onto the nose and outwards onto my chin and forehead, anywhere I dont want too much shine. I tend to miss out my cheeks as theyre going to have blush on them anyway. Powder will set any concealer youve applied and take away any unwanted shine.

I then apply blush. The colour will depend on what look Im going for. If I want sculpted cheeks I go for a brownish blush just underneath the cheekbone, quite often I will go for quite a bronzed cheek to add a bit of colour but the colour I wear more than anything is a pink tone. I actually love Rimmels range of blush (notice how Im not using any of my fancy kit products, just my every day cheap makeup)


If Im not doing a dark dramatic eye, I line my waterline with white eye pencil to brighten and open the eye. I use this quite a lot on brides for the same reason.


Here (hopefully) you can see the difference between an un-defined brow and a brow thats been defined with brow shadow.


Take your time, apply with a steady hand. Your flick needs to flick upwards to open the eye and I find it useful to do the flick first with my eye open so I can carry on the line of my lower waterline at the same upward angle (if that makes sense). Once Ive got the flick I close my eye and line from the outside in. This is just the easiest way for me, you may find your own way.

So its all starting to come together nicely. We have the neautral shadows, the strong defined brows, the winged liner. Time to apply mascara. Its totally up to you how much you apply. The classic 50's look proabbly would have been quite minimal or only on the upper lashes but I love mascara so I applied quite a lot of it especially because my lashes at the moment are quite sparse and short :(

Sooo..........I used another Soap & Glory product called Marvelips which has 2 ends. One end is colour, the other end is highlighter. It advised you to apply the colour first then use the highlighter in the middle of the lips afterwrds but I tried this and it didnt work for me so I applied it in reverse. I coated my lips in the highlighter first which I felt moisturised them a bit. I applied lots of the hightlighter to the cupids bow to accentuate it.


I wore this on Saturday over rel lip pencil and it gave a lovely bright pop of colour and a gorgeous glossy silky finish so perfect for a classic 50's look with the bright red lips. But for now I just wanted a brighter pop of colour so I applied a bit of this with a lip brush.


I hope you all enjoyed my first tutorial. I just feel like Ive ramble but hopefully Ive made sense and maybe Ive inspired you to create your own 50's inspired looks.
Im quite liking this look, Ive tried it out the past few days, maybe Ill keep it.
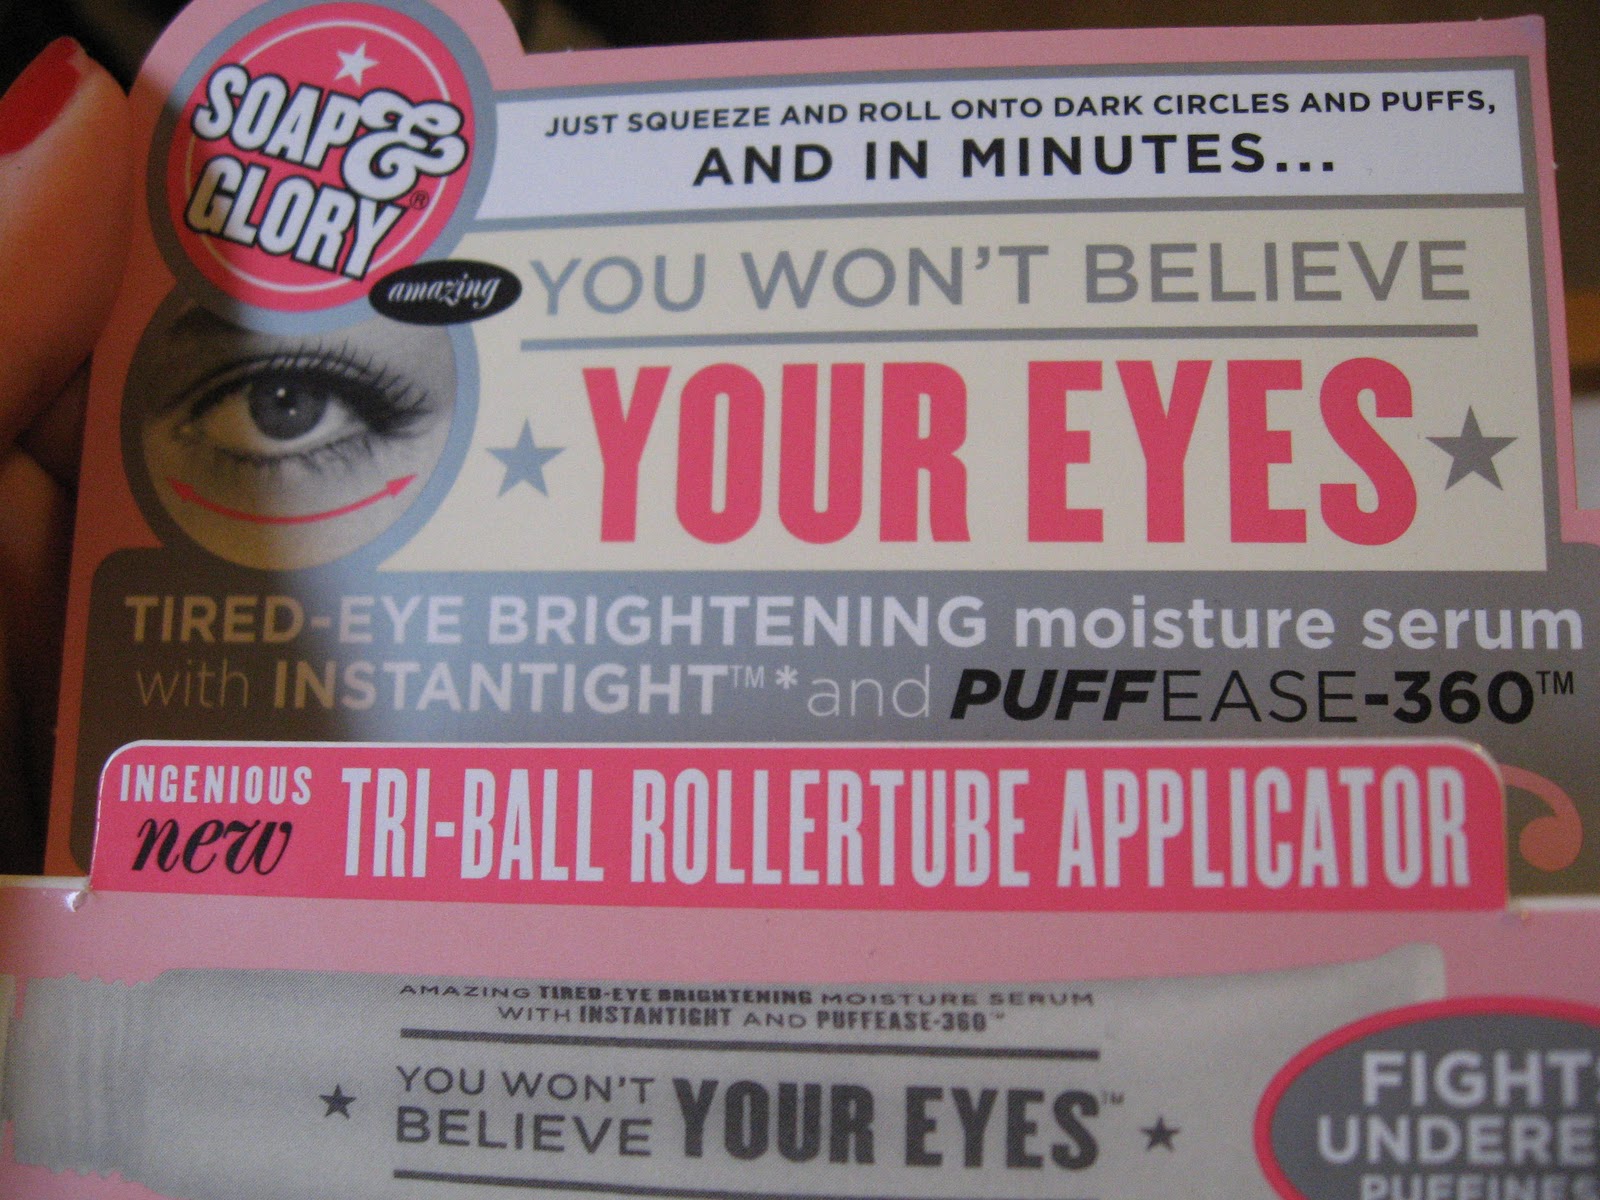
Soap & Glory "You wont believe your eyes" review
So it was my 25th birthday on Saturday and my lovely boyfriend bought me more Soap & Glory treats which I am loving at the moment. Im in danger of spending all of my money on this range at the moment.
I received "You wont believe your eyes" which is a roll on eye serum which claims to decrease the appearance of puffiness and dark circles with its illuminating serum.
 It has a 3 ball roll on applicator which is really easy to use and a little goes a long way.
 I actually dont have much darkness or puffiness (I dont think) so this product probably doesnt produce very visible results but it feels great. My eyes feel more awake, theres a slight tingling, cooling sensation and just leaves my eyes feeling refreshed. Really easy to use, Im sure itll last me ages. I love it.
Here are the products details copied from asos.com where you can buy this product for £9.25. Also available at Boots where theres currently a 3 for 2 offer.
Ive got more products to review so stay following.
I received "You wont believe your eyes" which is a roll on eye serum which claims to decrease the appearance of puffiness and dark circles with its illuminating serum.

Here are the products details copied from asos.com where you can buy this product for £9.25. Also available at Boots where theres currently a 3 for 2 offer.
 | ||
| On the left: Without serum On the right: After serum |
Ive got more products to review so stay following.
Tuesday, 15 February 2011
more benefit goodies......and baddies
So for those of you who read my other benefit post and enjoyed it....heres more. Ill try to include prices where possible and as usual these are just my views and my opinions. Ive been informed some of these are discontinued but I wanted to review them anyway. Its good practise for future reviews.
First up:
That Gal £21.50 - This is a flaw-diffusing primer which provides a subtle radiance for any skin tone.

I didnt get any good pics of this since there was next to no change in the look of my bare face. It did give a lovely glow to my skin and I felt it evened out my complexion. Liked it but Ive said it before and Ill say it again.....how much?
You Rebel Lite £23.50 - A tinted moisturiser with SPF 15. I already owned You Rebel which is the same thing in a slightly darker shade. It was actually too dark for me and seemed to get darker on my skin and looked streaky :s Quite often I had to lighten it up with some lighter foundation and even then it wasnt great so I was very happy to try You Rebel Lite and its soooooo much better. Heres a swipe of both of them.
I could wear this on its own and no doubt I will be wearing it over summer or if I ever save up enough to go on my travels. At the moment Im mixing it with my Max Factor foundation just to give it a softer texture and a slightly lighter coverage. The rebel lite on it own is too sheer for my spotty skin. It is quite strongly scented. I cant figure out what it is but its not unpleasant but this does however mean you have to avoid contact with the eyes at all costs. Im fairly careful with it but sometimes it gets a little too close my eyes and they end up streaming.
Rush Hour £17.50 - a makeover for lips and cheeks apparently.
 Hmmm ok so good points:
Lovely soft texture, easy application, long lasting. Its not thick so I found it was less likely to get stuck to my teeth during the day. Felt lovely and moisturising on my lips and I liked the darkish colour. It doesnt look as dark on the picture.

Bad points:
Looked terrible on my cheeks. Didnt add much colour at all, felt a bit weird putting it on my lips then on my cheeks. I wouldnt use it on my cheeks but I can see how its be handy to have a 2 in 1 product. I just dont think its right but I do love it as a lipstick.
Girl Meets Pearl £24.50 - Ive been using this as a highlighter but it's sold as a pearly face primer. I dont understand why youd need a totally pearlescent face. It says to mix with your moisturiser but its perfectly fine on its own. Very similar to high beam but less thick and less glittery so I actually prefer this to any other highlighting product in the benefit range. I actually think I would buy this if it wasnt soooo expensive.

Show Offs! shimmer powders - I looooove these a lot. I havent used them much but I love the colours and the fact that they dont just fade into your skin once applied. Not sure on the price, I think I included it on the last post and I think the lady who sends me these samples actually gave me the price at some point so ill post it if I can find it. I got sent 2 more called Ruby-doo and Meringue. I will deffo be wearing at least one of these when I go out on Saturday for my 25th.
I love both of these colours. I think these are discontinued which makes me very sad. I assume theyre similar to the Lust Dusters possibly.
Im undecided about this next product. Benetint priced at £24.50. Really not worth it in my honest opinion. Its a lip and cheek stain which seems to stain everything it comes into contact with. I was sent a small tester pot of it.

I hated it on my cheeks, I unfortunately didnt get a picture of this...wish I had. it says to apply 3 strokes and quickly blend with fingertips for a naturally sheer and radiant flush. I was left with a big red blob and stained fingers all day. Not attractive. However, when applied to the lips it created a lovely sheer veil of colour, non transferrable and long lasting. It was lovely, Id use it for bridal as it wont kiss off and would only need minimal touch ups. It did dry my lips a little bit though. Had a lovely floral scent, quite subtle.
Benetint has a little sister called Posietint also priced at £24.50.

I found it to be a completely different product to benetint. It was thicker, pinker had no scent and worked better on cheeks than it did on lips and it didnt stain my fingers.
I would use this for bridal makeup as a long lasting alternative to blush. I find it works best under foundation. I didnt work at all as a lip product for me as my lips are already quite pinky.
Ok so this isnt a makeup product but I was sent a few skincare products as well and I think the best foundation to good makeup is good skin.
I got sent Dear John a movin' on facial cream.
 Priced at £26.50 its VERY expensive for a moisturiser and I certainly think theres products out there that do the same job but for a much smaller sum of money. It smells pleasant and sinks into the skin really quickly leaving it soft and smooth. I actually really like it although the resulting soft hydrated skin is very similar to the resuls I get with the moisturiser I use that costs me about £3 from superdrug.
I also got sent an oil free moisturiser called Do it daily! which I thought was a great name for it although after testing it I never wanted to do it ever again. Ive just finished watching the BRITS so I have to award this one the WORST product award. I think this is one of the discontinued products and I dont disagree with their decision to scrap it.

Oil Free moisuriser with SPF 10. One of the worst things Ive ever put on my face. It says its for all skin types but if I had sensitive skin I think I would have been running to the nearest sink to wash it off. Im combination dry and oily and this made my skin feel like it was burning. It had a very vinegary smell to it which I really didnt like at all, it didnt sink into the skin very well and actually made my oily areas more oily. However, my dry patches did clear up and once the burning sensation has subsided my skin was very soft. I wouldnt buy this even if it wasnt discontinued. God help me if I had got this in my eyes.
Next up is another product I cant decide about. Its called California kissing, no idea of the price.

It has a pleasant minty smell and tastes lovely. Its slightly glittery as you can see. I wouldnt wear this during the day as its quite sparkly, hmm I dont know, maybe I would. Im very undecided about this one, I think Ill use my sample until it runs out.

I do like it, its similar to the silky lip balm in texture and thickness but better tasting which I like since I do lick my lips quite a bit. I love the feel of it on my lips but the thing I dont like is it reminds me of something I used to have when I was very young, some cheap tacky lipgloss from the £1 shop maybe. I think its the colour and the sparkles and the fact its mint scented. It just seems so cheap and childish, Im a bit put off and I prefer my other lipbalms for a fraction of what this would cost.....you cant go wrong with a bit of carmex.
Benefit products I am loving at the moment and would definitely buy if they were half the price:
- You Rebel Lite
- The Porefessional Primer
- Girl Meets Pearl
- Boi-ing Concealer
I hope youve enjoyed this post, there may be more....who knows. Stay tuned, I plan to start doing some tutorials although my camera doesnt always show the makeup off to its best :( If you have any requests for celebrity looks, let me know and Ill do my best.
First up:
That Gal £21.50 - This is a flaw-diffusing primer which provides a subtle radiance for any skin tone.
I didnt get any good pics of this since there was next to no change in the look of my bare face. It did give a lovely glow to my skin and I felt it evened out my complexion. Liked it but Ive said it before and Ill say it again.....how much?
You Rebel Lite £23.50 - A tinted moisturiser with SPF 15. I already owned You Rebel which is the same thing in a slightly darker shade. It was actually too dark for me and seemed to get darker on my skin and looked streaky :s Quite often I had to lighten it up with some lighter foundation and even then it wasnt great so I was very happy to try You Rebel Lite and its soooooo much better. Heres a swipe of both of them.
 |
| you rebel lite on the left you rebel on the right. |
Rush Hour £17.50 - a makeover for lips and cheeks apparently.

Lovely soft texture, easy application, long lasting. Its not thick so I found it was less likely to get stuck to my teeth during the day. Felt lovely and moisturising on my lips and I liked the darkish colour. It doesnt look as dark on the picture.

Bad points:
Looked terrible on my cheeks. Didnt add much colour at all, felt a bit weird putting it on my lips then on my cheeks. I wouldnt use it on my cheeks but I can see how its be handy to have a 2 in 1 product. I just dont think its right but I do love it as a lipstick.
Girl Meets Pearl £24.50 - Ive been using this as a highlighter but it's sold as a pearly face primer. I dont understand why youd need a totally pearlescent face. It says to mix with your moisturiser but its perfectly fine on its own. Very similar to high beam but less thick and less glittery so I actually prefer this to any other highlighting product in the benefit range. I actually think I would buy this if it wasnt soooo expensive.

 | |
| Meringue on the left and Ruby-doo on the right both swiped dry. |
Im undecided about this next product. Benetint priced at £24.50. Really not worth it in my honest opinion. Its a lip and cheek stain which seems to stain everything it comes into contact with. I was sent a small tester pot of it.

 |
| Blended onto hand |
Benetint has a little sister called Posietint also priced at £24.50.

I found it to be a completely different product to benetint. It was thicker, pinker had no scent and worked better on cheeks than it did on lips and it didnt stain my fingers.
 |
| Applied to cheeks |
I would use this for bridal makeup as a long lasting alternative to blush. I find it works best under foundation. I didnt work at all as a lip product for me as my lips are already quite pinky.
Ok so this isnt a makeup product but I was sent a few skincare products as well and I think the best foundation to good makeup is good skin.
I got sent Dear John a movin' on facial cream.

I also got sent an oil free moisturiser called Do it daily! which I thought was a great name for it although after testing it I never wanted to do it ever again. Ive just finished watching the BRITS so I have to award this one the WORST product award. I think this is one of the discontinued products and I dont disagree with their decision to scrap it.

Oil Free moisuriser with SPF 10. One of the worst things Ive ever put on my face. It says its for all skin types but if I had sensitive skin I think I would have been running to the nearest sink to wash it off. Im combination dry and oily and this made my skin feel like it was burning. It had a very vinegary smell to it which I really didnt like at all, it didnt sink into the skin very well and actually made my oily areas more oily. However, my dry patches did clear up and once the burning sensation has subsided my skin was very soft. I wouldnt buy this even if it wasnt discontinued. God help me if I had got this in my eyes.
Next up is another product I cant decide about. Its called California kissing, no idea of the price.

It has a pleasant minty smell and tastes lovely. Its slightly glittery as you can see. I wouldnt wear this during the day as its quite sparkly, hmm I dont know, maybe I would. Im very undecided about this one, I think Ill use my sample until it runs out.

I do like it, its similar to the silky lip balm in texture and thickness but better tasting which I like since I do lick my lips quite a bit. I love the feel of it on my lips but the thing I dont like is it reminds me of something I used to have when I was very young, some cheap tacky lipgloss from the £1 shop maybe. I think its the colour and the sparkles and the fact its mint scented. It just seems so cheap and childish, Im a bit put off and I prefer my other lipbalms for a fraction of what this would cost.....you cant go wrong with a bit of carmex.
Benefit products I am loving at the moment and would definitely buy if they were half the price:
- You Rebel Lite
- The Porefessional Primer
- Girl Meets Pearl
- Boi-ing Concealer
I hope youve enjoyed this post, there may be more....who knows. Stay tuned, I plan to start doing some tutorials although my camera doesnt always show the makeup off to its best :( If you have any requests for celebrity looks, let me know and Ill do my best.
Subscribe to:
Posts (Atom)